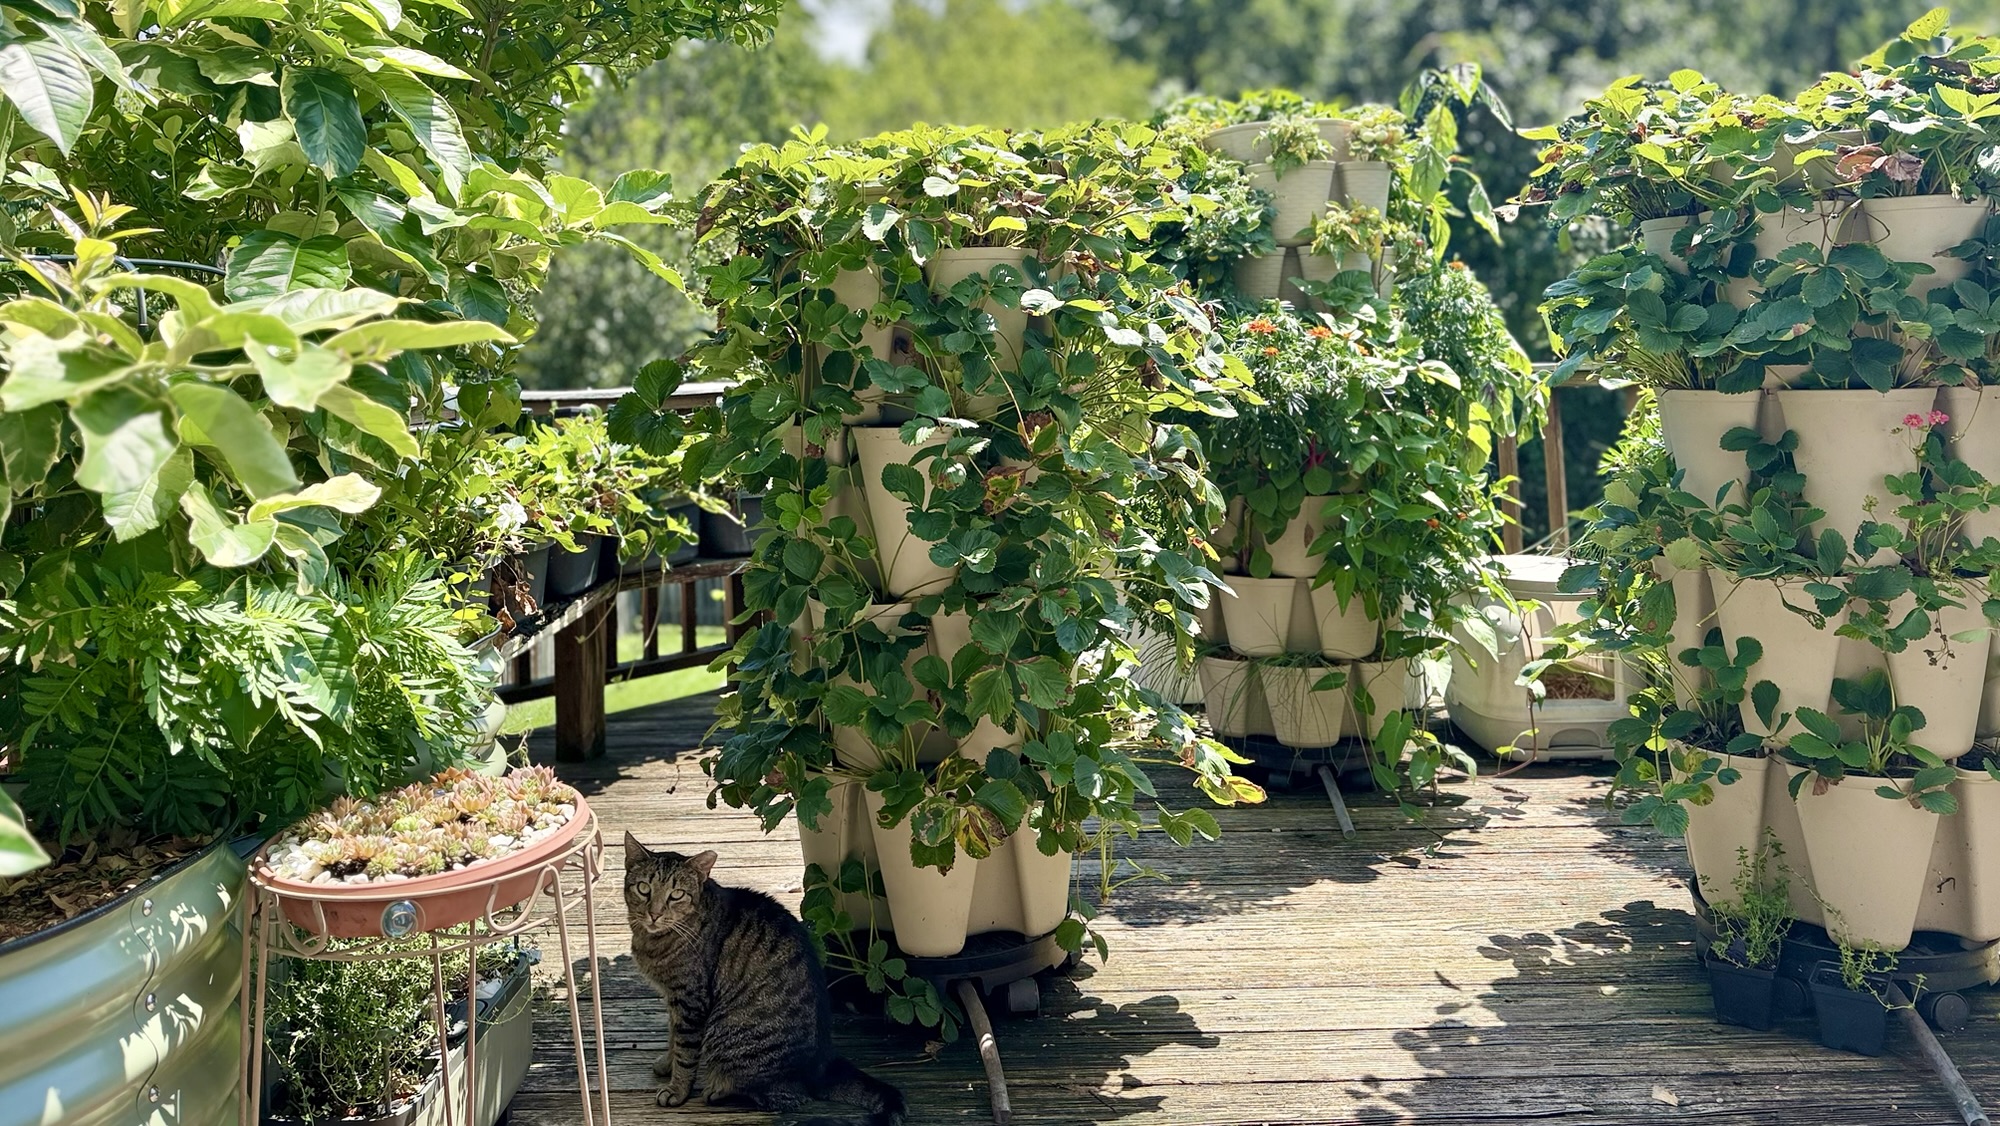
When you garden in a small space, every square foot matters.
I have a small townhouse backyard, so I cannot keep adding traditional garden beds every time I want to grow something new. Over the years, vertical gardening has helped me make better use of the space I already have—and my GreenStalk planters have become an important part of that approach.
Instead of spreading plants across the ground, a GreenStalk planter allows me to grow upward in stacked planting pockets. I can fit dozens of plants into a footprint that takes up very little room on my deck garden.

I currently use a seven-tier GreenStalk Leaf planter with 42 planting pockets, along with two Original 4-tier planters. My first Original planter was a 5-tier, but I later purchased a 3-tier to create two 4-tier planters. Over the seasons, I’ve grown strawberries, lettuce, bok choy, spinach, herbs, and other compact vegetables in them.
It does not replace my raised beds, but it gives me another productive growing area without making my small garden feel crowded.
Here is how I use GreenStalk planters for vertical gardening and what I have learned along the way.
What Is a GreenStalk Vertical Planter?
A GreenStalk is a stackable vertical container garden made up of individual tiers with planting pockets around each level.


The tiers are filled with potting mix and stacked on top of one another. Water is poured into the reservoir at the top, where it is designed to distribute evenly through the planter from top to bottom.
Depending on the model and number of tiers, one planter can hold many plants while using far less ground space than dozens of separate pots.
This makes it especially useful for:
- Patios
- Decks
- Balconies
- Townhouse gardens
- Small backyards
- Renters who cannot install permanent beds
- Gardeners who want food growing close to the kitchen
Why I Like Vertical Gardening With GreenStalk
The most obvious benefit is how much food I can grow in such a small footprint.
My seven-tier Leaf planter (7-inch deep pockets) gives me 42 planting spaces for shallow-rooted and compact crops. My 4-tier Original planters (10-inch deep pockets) can hold up to 24 strawberry plants each. The 5-tier GreenStalk Original planter has 30 individual planting pockets, which means you can grow up to 30 plants if you plant one in each pocket.
But depending on what you’re growing, you can fit even more. Smaller crops and plants grown for baby-leaf harvests can be planted more densely, with multiple plants growing in a single pocket.
That’s what makes a vertical planter so useful for a small-space garden. You’re able to turn a relatively small footprint into dozens of individual growing spaces.
Instead of thinking only about how many square feet you have available, you’re taking advantage of the space upward and potentially growing 30 or more plants in an area that would otherwise hold only a few containers.

Even when I plant just one crop per pocket, the total growing space is impressive.
It also helps me:
- Keep plants organized
- Grow several varieties in one planter
- Garden at a more comfortable height
- Reduce the number of separate pots I need
- Rotate the planter for better light exposure
- Move the planter when necessary
- Keep frequently harvested crops close to the house
For a small-space gardener, that flexibility is extremely valuable.
What Can You Grow in a GreenStalk?
GreenStalk planters are best suited to vegetables, herbs, flowers, and fruits with relatively compact root systems.
Some of the crops I recommend include:
Leafy Greens
- Lettuce
- Spinach
- Bok choy
- Tatsoi
- Mizuna
- Arugula
- Mustard greens
- Compact kale
- Swiss chard
Herbs
- Parsley
- Cilantro
- Dill
- Chives
- Thyme
- Oregano
- Mint
- Basil
Root Crops
- Radishes
- Small beets
- Green onions
- Short carrot varieties
- Small turnips
Fruits & Fruiting Vegetables
- Strawberries
- Compact peppers
- Micro tomatoes
- Patio eggplants
Flowers
- Marigolds
- Nasturtiums
- Pansies
- Violas
- Alyssum
- Compact pollinator flowers
Not every crop is equally suited to every planter depth. Leafy greens and herbs are the easiest, while larger fruiting vegetables need more space, fertility, and consistent watering. That said, I’ve seen gardeners push the limits of what’s possible in these systems—the potential is wider than you might expect.
My Favorite Crops to Grow in It
Some crops have consistently performed especially well for me.
Bok Choy
Bok choy has been one of the most productive vegetables I’ve grown in my GreenStalk. It’s one of those crops that really shows just how much food you can produce from a small footprint when you take advantage of vertical growing space.
I typically plant one bok choy seedling in each pocket, which gives each plant enough room to develop. By harvest time, I can pick a generous amount of full-sized bok choy from a planter that takes up very little ground space.

Compact bok choy varieties are especially well suited to vertical planters because they don’t require a huge amount of root or growing space. You can fill multiple pockets with plants and essentially create a tower of fresh greens.
It’s one of the reasons I love growing bok choy this way. Instead of dedicating an entire raised bed to it, I can grow a substantial harvest vertically while saving my raised bed space for crops that need more room.
For anyone gardening on a patio, deck, balcony, or in a small backyard, bok choy is one crop I would definitely consider for a vertical planter.
Bok choy appreciates:
- Cool weather
- Consistent moisture
- Fertile potting mix
- Protection from cabbage worms
Because it grows quickly, I can replant pockets soon after harvest.
Want to build a strong gardening foundation? This beginner-friendly guide titled “How to Grow Bok Choy” will be a great next step.
Micro Tomatoes
Aside from leafy greens, micro tomatoes grow surprisingly well in a GreenStalk—even in the shallower GreenStalk Leaf planter. If you really don’t have enough space for full-sized tomato plants, micro tomatoes are an excellent option for growing food vertically.
One of the things I love about micro tomato varieties is how quickly they can start producing. Many varieties produce earlier than larger tomatoes, so you can begin enjoying homegrown tomatoes without waiting as long for those first fruits to ripen.

They’re also perfect for experimenting with different varieties in a small space. I like planting several varieties in different pockets, especially tomatoes with different colors, and flavors.
By harvest time, instead of getting just one type of tomato, I can pick a colorful mixture of red, yellow, orange tomatoes and create my own little cherry tomato blend straight from the garden. 🍅
For a gardener working with a patio, deck, balcony, or another small growing area, this is such a fun way to grow tomatoes without dedicating a large container or raised bed to each plant.
You don’t need room for giant tomato plants to enjoy homegrown tomatoes. Sometimes going mini allows you to grow even more variety in less space.
Want to learn more about Micro Tomatoes? This beginner-friendly guide titled “How to Grow Micro Tomatoes” will help you grow with confidence.
Strawberries
Strawberries are one of my favorite fruits to grow in a vertical planter. As the plants grow, the leaves, flowers, runners, and berries cascade over the sides of the pockets, creating a beautiful edible display.
Growing strawberries this way is practical, too. The pockets help keep much of the fruit elevated instead of resting directly on wet soil. This can help keep the berries cleaner and reduce some of the problems that come from prolonged contact with damp soil.

Harvesting is also much easier. The berries hang along the outside of the planter where I can easily see and pick them instead of searching underneath a dense patch of strawberry plants growing at ground level.
And because strawberries naturally produce runners, a vertical planter gives them a fun way to cascade from one level to another. You can even use some of those runners to propagate new plants and eventually replace older strawberry plants as their production begins to decline.
For a small-space gardener, strawberries are a perfect example of how growing vertically can be both productive and beautiful. 🍓
Strawberries are perennial, but growing them in a stacked system requires attention to winter protection, watering, runners, and soil fertility.
Want to learn more about strawberries? This beginner-friendly guide titled “How to Grow Strawberries” will help you grow with confidence.
Spinach and Other Greens
Spinach, tatsoi, mizuna, and other leafy greens are excellent crops for vertical planters, especially during the cooler months of the growing season.
You can plant them individually and allow each plant to grow larger, or sow them more densely if your goal is to harvest tender baby leaves. Growing them densely is a great way to maximize each pocket when you’re planning to harvest the leaves while they’re still young.
These greens perform best during the cooler temperatures of spring and fall. Once summer heat arrives, crops like spinach can quickly bolt or struggle, so I like taking advantage of my vertical growing space for them earlier in spring and again when temperatures begin cooling down in fall. But it doesn’t stop there because in the summer I plant water spinach or Kang Kong, Amaranth and marigolds.

They’re also perfect for succession planting. Instead of planting everything at once, you can sow a few pockets at a time and continue planting more every couple of weeks for a longer harvest.
When you combine several types of greens throughout the planter, you can grow your own mix of fresh salad and cooking greens from a surprisingly small footprint.
Want to learn more about spinach and other leafy greens to plant in your GreenStalk planter? This beginner-friendly guides will help you grow with confidence.
- How to Grow Spinach
- How to Grow Mizuna
- How to Grow Water Spinach
- How to Grow Amaranth
- How to Grow Marigolds
Herbs
A GreenStalk also works beautifully as a vertical herb garden, especially if you want to grow several herbs without giving up a lot of valuable garden space.
If possible, keeping your herb planter close to the kitchen makes harvesting so much easier. When fresh herbs are only a few steps away, you’re much more likely to grab a handful while you’re cooking instead of forgetting they’re growing somewhere in the garden.

Herbs like chives, parsley, cilantro, thyme, oregano, and compact varieties of basil can be good options for the individual pockets. You can dedicate each pocket to a different herb or plant several pockets with the herbs you use most often.
So far, I’ve personally grown cilantro and chives in my GreenStalk, and I love having another way to grow these useful kitchen herbs vertically.
Herbs are already some of the most practical plants you can grow at home because you don’t need a huge harvest at once. Often, you just need a few leaves or stems for a meal.
A vertical herb garden makes that even more convenient: a lot of variety, very little ground space, and fresh herbs ready to harvest whenever you need them.
Want to learn more about herbs to grow vertically in your GreenStalk planter? This beginner-friendly guides will help you grow with confidence.
Choosing the Best Location
A GreenStalk becomes heavy once filled with moist potting mix, so placement matters.

Look for:
- A flat, stable surface
- Easy access to water
- Enough sunlight for your crops
- Space to rotate or access all sides
- Protection from strong wind
Most vegetables need at least six hours of direct sun, though leafy greens may appreciate afternoon shade in hot weather.
Also pay attention to seasonal changes. A spot that is sunny in spring may become partially shaded later due to trees, fences, or nearby structures.
Use High-Quality Potting Mix
Do not use heavy garden soil in a GreenStalk.
It can compact, reduce drainage, and limit airflow around roots.
Instead, use a high-quality container potting mix that is:
- Well-draining
- Moisture-retentive
- Light and airy
- Supportive of root growth
I also add compost or worm castings for extra fertility.
Recently, I started adding Wakefield Biochar as well, and I’ve been very happy with the results. During a heat wave, the plants in the biochar-amended pockets showed noticeably less stress than the others. Moving forward, I plan to continue using it for improved moisture and nutrient retention.
Because container soil is used intensively, it should be refreshed periodically.
How Much Soil Do You Need?
Vertical planters require more potting mix than they appear to at first glance.
It’s always better to have extra soil on hand than to run out mid-assembly.
Fill each pocket completely and gently firm the mix without compacting it. Expect some settling after the first few waterings, and top off as needed.
Plan the Crops Before Stacking
It’s much easier to prepare each tier before fully assembling the planter.
My basic process is:
- Fill one tier with moist potting mix. I avoid garden soil and prefer Pro-Mix potting mix because it drains well and doesn’t compact.
- Place the tier in its final position. I highly recommend the Ultimate Spinner base because it allows easy rotation and movement for even sunlight.
- Add the watering disc that distributes water through the system.
- Stack the next tier. I use a carrot cap or plastic cover over the watering hole temporarily to prevent debris from clogging the system.
- Remove the carrot cap (or plastic cover) and continue stacking until complete.
- Water thoroughly from the top and check each pocket.
You can plant while stacking, but I prefer assembling first and planting afterward for better control.
Planning placement ahead of time also helps prevent taller plants from shading smaller ones.
Where to Place Different Crops
Crop placement makes a big difference in performance.
Upper Tiers
These receive the most sun and dry out faster. Best for:
- Sun-loving herbs
- Compact peppers
- Mini tomatoes
- Rosemary
- Thyme
- Heat-tolerant flowers
Middle Tiers
Best for:
- Lettuce
- Bok choy
- Spinach
- Parsley
- Strawberries
- Basil
Lower Tiers
These stay cooler and retain moisture longer. Best for:
- Shade-tolerant greens
- Mint
- Parsley
- Cilantro
- Cool-season crops
Exact placement depends on your sun direction and whether you rotate the planter.
Do Not Overcrowd the Pockets
It’s tempting to overplant when seedlings are small, but overcrowding leads to competition for:
- Water
- Nutrients
- Root space
- Sunlight
- Airflow
For full-sized crops, one plant per pocket is usually best.
You can plant more densely when growing:
- Baby lettuce
- Baby spinach
- Green onions
- Small radishes
- Microgreen-style harvests
Spacing depends on your harvest goals.
Watering a GreenStalk Planter
The top reservoir is one of the most convenient features, but it doesn’t eliminate the need to check individual pockets.
Watering needs depend on:
- Temperature
- Wind
- Plant size
- Crop type
- Number of tiers
- Sun exposure
- Potting mix
- Rainfall
In cool weather, moisture lasts longer. In summer heat, daily checks may be necessary.
I pay special attention to the top tiers since they dry out faster.
After watering, I still check several pockets by hand to ensure even moisture.
Rotate the Planter
One side of a vertical planter often receives more sun than the other.
Rotating helps:
- Balance sunlight exposure
- Encourage even growth
- Prevent leaning
- Improve access for harvesting
A rotating base like the Ultimate Spinner with Wheels or Ultimate Mover makes this much easier, especially when the planter is near a wall or railing.
Rotate gradually to avoid shocking shade-grown plants.
Fertilizing Vertical Planters
Container plants rely entirely on the nutrients in their soil.
Because watering leaches nutrients over time, regular feeding is important.
I start with quality potting mix and compost, then fertilize based on crop needs. And because the plants in each tier shares the same root space it’s a good idea to plant crops with similar needs to make it easier to apply fertilizer.

Leafy greens benefit from:
- Diluted Alaska Fish Emulsion
- Seaweed Humic Acid
- Compost Tea
- Worm castings
Fruiting crops like peppers, tomatoes, and strawberries often need more frequent feeding. I love using liquid fertilizer like MorBloom that contains more phosphorus and potassium to encourage more fruiting.
Always follow fertilizer instructions and avoid over-application.
Mulching the Pockets
A light mulch layer helps retain moisture.
My favorites include:
- Cedar pet bedding (wood shavings)
- Shredded leaves
- Fine straw
- Lightweight organic mulch
Keep mulch away from plant crowns and avoid burying seedlings.
Even a thin layer can significantly reduce evaporation.
Protecting Plants From Heat
Vertical planters can dry quickly in hot, windy conditions.
To reduce stress:
- Water early in the morning
- Move into afternoon shade if possible
- Use shade cloth during heat waves
- Mulch lightly
- Avoid letting soil dry completely
- Rotate for even exposure
Cool-season crops like lettuce, spinach, and bok choy may need extra protection during late spring heat.
Protecting Plants From Pests
GreenStalk planters reduce some ground-level pests but do not eliminate pest pressure.
Watch for:
- Aphids
- Cabbage worms
- Flea beetles
- Spider mites
- Slugs
- Leaf miners
- Birds
- Squirrels
Inspect leaves regularly, especially undersides and centers.
Light insect netting can help protect greens and brassicas if properly secured.
Growing Through the Seasons
One of the biggest advantages of vertical gardening is year-round replanting.
Spring
- Lettuce
- Spinach
- Bok choy
- Radishes
- Cilantro
- Dwarf peas
- Strawberries
Summer
- Basil
- Compact peppers
- Micro tomatoes
- Herbs (thyme, chives, parsley)
- Heat-tolerant greens (amaranth, water spinach)
- Marigolds
Fall
- Lettuce
- Spinach
- Bok choy
- Tatsoi
- Mizuna
- Kale
- Cilantro
- Radishes
Winter
Depending on your climate:
- Spinach
- Kale
- ParsleyStrawberries
- Hardy greens
In my Zone 7 garden, I use frost cloth or GreenStalk covers to extend the season. Containers are more exposed to cold than in-ground plantings, so I usually don’t grow much in the leaf planter during winter. My Original planters stay filled with strawberries year-round. I mulch the soil and move planters closer together and near the house to help retain heat.
Succession Planting in a GreenStalk
The individual pockets make succession planting simple.
After harvest:
- Remove old roots and debris
- Add compost or fresh potting mix
- Check moisture
- Replant immediately
Examples:
- Spring spinach → basil
- Lettuce → compact peppers
- Bok choy → micro tomatoes
- Water spinach → fall spinach
- Spring bok choy → herbs like parsley → fall greens
This keeps production going all season.
Refreshing the Soil
Potting mix breaks down and loses nutrients over time.
Between plantings, I refresh with:
- Compost
- Worm castings
- Fresh potting mix
- Slow-release fertilizer (when needed)
Full soil replacement is not always necessary, but it may be required if drainage declines or disease becomes an issue.
Can You Grow Large Vegetables in It?
Some larger crops can grow, but only with careful selection.
Compact varieties are best.
Large plants may:
- Shade neighbors
- Require staking
- Dry out pockets quickly
- Need frequent feeding
- Outgrow the space
I prefer to grow large vegetables in raised beds and reserve GreenStalks for compact, high-yield crops.
What I Would Not Grow in Every Pocket
I avoid filling an entire planter with:
- Indeterminate tomatoes
- Full-sized eggplants
- Large squash
- Pumpkins
- Melons
- Corn
A single well-managed plant may work, but full planters of large crops become difficult to maintain.
Is a GreenStalk Worth It for a Small Garden?
For my garden, absolutely.
It adds significant growing space without expanding my footprint. It’s especially valuable for frequent harvest crops like greens, herbs, bok choy, and strawberries.
But it is not maintenance-free.
You still need to:
- Use enough potting mix
- Water consistently
- Rotate regularly
- Feed plants
- Choose appropriate crops
- Monitor moisture
- Protect from weather extremes
It is a tool, and its success depends on how you use it.
My Experience With a GreenStalk Planters
My 7-tier GreenStalk Leaf planter gives me 42 individual pockets of growing space in one vertical system. For someone trying to grow as much food as possible without taking up more ground space, that’s a lot of growing room packed into a small footprint.
Bok choy has been one of my most successful crops in it. I’ve harvested an abundant amount without having to dedicate valuable raised-bed space to it. I’ve grown other leafy greens in the Leaf planter as well, and they’ve thrived.
Strawberries are another favorite of mine because they look beautiful cascading over the sides and the berries are so easy to pick. However, I prefer growing my strawberries in the GreenStalk Original planter instead of the Leaf.
As strawberry plants mature, their root systems get larger and can eventually become crowded. The deeper pockets of the Original give them more soil volume, more room for their roots, and a larger moisture reserve. That’s especially helpful during summer because I don’t want the pockets drying out too quickly.
Crop Placement Matters
One thing I’ve learned is that every tier doesn’t necessarily receive the same amount of sunlight.
Plants near the bottom can sometimes struggle because those pockets may receive less sun depending on where the planter is positioned. Over time, I’ve learned how important crop placement, sunlight direction, and moisture balance are when growing in a vertical system.
I used to line my GreenStalk planters up fairly close together. Now I spread them out more so sunlight can reach more sides of each planter.
I’m also intentional about rotating them periodically. This helps prevent one side from constantly receiving the best sunlight while another stays shaded.
There’s definitely a learning curve, but once you understand how your planter behaves in your particular growing space, it can become one of the most productive parts of the garden.
Rain Doesn’t Always Mean the Planter Is Watered
One lesson that surprised me was realizing that just because it rained doesn’t necessarily mean my GreenStalk received enough water.
A tall vertical planter has a relatively small surface area at the top to catch rainfall compared with the amount of soil and number of plants throughout all tiers. Rainfall alone may not provide enough water to thoroughly hydrate the entire planter.
I keep two or three buckets on my deck to collect rainwater, and I use that water on my GreenStalk just as I normally would.
And the same simple moisture test I use with other containers still applies: stick a finger into the soil and check it.
Over time, I’ve also gotten familiar with roughly how much water my planter needs. One of my cues that I’ve watered thoroughly is when I begin seeing water drain from the planter.
Protecting a Vertical Planter From Wind
I haven’t had a problem with my GreenStalk falling over during storms, but I still take precautions when strong winds are expected.
Whenever possible, I move the planters closer to an area where they can get some protection from the wind. Even positioning several planters near each other can help create a more sheltered setup rather than leaving one completely exposed.
During winter, I also move them closer to the house where they’re less exposed.
Healthy Plants Start With Healthy Soil
One of the biggest lessons I’ve learned is that the key to thriving plants in a GreenStalk is still the soil.
A vertical planter may look different from a traditional container, but the same basic principles apply. Plants continuously use nutrients as they grow, so you can’t expect the same potting mix to remain productive forever without replenishing it.
Before planting another season of annual vegetables, I like to refresh the soil and add amendments. That’s fairly easy when I’m removing one seasonal crop and planting another.
Perennials like strawberries require a little more planning because they stay in the planter from year to year. I try to remember to replenish their nutrients at least once a year rather than assuming the original potting mix will continue feeding them indefinitely.
If the potting mix becomes extremely difficult to rehydrate and water repeatedly runs through or off instead of soaking in, the mix may have become hydrophobic. At that point, I take it as a sign that the soil needs some attention. I can unstack the planter, inspect the potting mix and roots, and decide whether I need to rehydrate, amend, or replace some of the old mix.
Refreshing Older Strawberry Plants
This is also a good opportunity to evaluate my strawberry plants.
Strawberries are perennial and can survive for several years, but that doesn’t necessarily mean an older plant will remain equally productive forever. I’ve noticed that many of my strawberry plants that are more than three years old aren’t producing nearly as well anymore.
Meanwhile, they’re sending out a lot of runners.
Instead of fighting all those runners, I can use some of them to propagate healthy young plants and gradually replace my older ones. My goal is to keep track of when each generation was planted so I can refresh my strawberry planting roughly every few years instead of waiting until production noticeably declines.
That’s one of the things I appreciate about gardening: you learn how your growing system works by actually growing in it.
I’ve learned where my GreenStalk gets the most sun, which crops perform best in different pockets, how much water it needs, how it behaves after rain, where to position it during storms, and when the soil and perennial plants need refreshing.
The planter helps me maximize my space, but learning how to manage the little environment inside those pockets is what makes it truly productive.
GreenStalk Vertical Gardening Checklist
- Choose a flat, sunny location
- Place before filling
- Use quality potting mix
- Match crops to pocket depth
- Avoid overcrowding
- Place tall plants strategically
- Check moisture regularly
- Rotate for even light
- Feed as needed
- Mulch lightly
- Replant after harvest
- Refresh soil between cycles
- Protect from heat and cold
Final Thoughts
Vertical gardening has allowed me to grow far more food without expanding my small backyard.
GreenStalk planters turn a small footprint into dozens of productive growing spaces.
They work especially well for greens, herbs, strawberries, compact vegetables, and continuous succession planting. They also keep everything organized and close to the kitchen.
The key is to treat them as active container gardens—not passive systems. With good soil, proper watering, thoughtful placement, and regular maintenance, they can be incredibly productive.
You don’t need a large yard to grow a meaningful garden.
Sometimes, the best way to grow more is simply to grow upward.
Frequently Asked Questions
What grows best in a GreenStalk planter?
Leafy greens, herbs, strawberries, radishes, green onions, bok choy, and other compact crops perform best.
How often should you water a GreenStalk?
It depends on weather, season, and crop type. Check regularly, especially during hot or windy conditions.
Can you grow tomatoes in a GreenStalk?
Yes, but only compact or micro varieties. They require support, feeding, and consistent watering.
Can GreenStalk planters stay outside in winter?
Yes, but plants are more exposed than in-ground gardens. Protection depends on your climate and crops.
Can you grow strawberries in a GreenStalk?
Yes. They are one of the best crops for vertical planters.
Do you need to replace the potting mix every year?
Not always. Refreshing with compost and amendments is often enough unless soil quality declines.
Does every pocket get equal water?
Water is distributed through the system, but conditions vary. Always check individual pockets.
Is a GreenStalk good for beginners?
Yes—especially for easy crops like greens, herbs, radishes, and strawberries.
Related Articles
- How to Grow Vertically in Small Spaces
- Best Vegetables for Beginners
- How to Grow Lettuce
- How to Grow Spinach
- How to Grow Bok Choy
- How to Grow Strawberries
- Succession Planting for Continuous Harvests
- How to Mulch Your Garden Properly
- How Often Should You Water Your Garden?
- Raised Beds vs. Containers: Which Is Better?
This page contains affiliate links to my brand partners like Vego Garden, GreenStalk, Walmart & Amazon at no extra cost to you.
Your support helps me create free gardening content. Thank you!


Leave a Reply