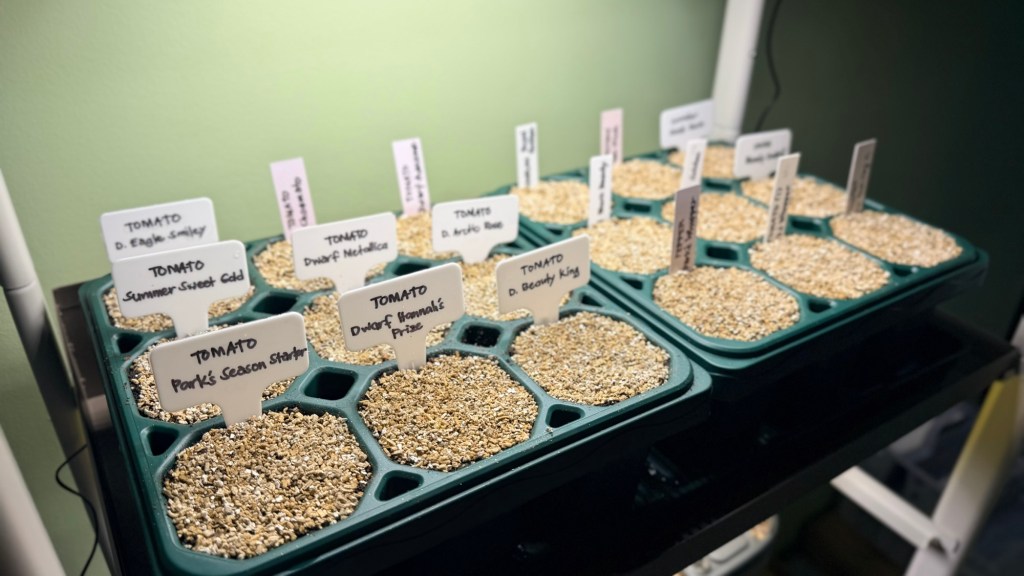
Starting vegetables from seed is one of the most rewarding parts of gardening. Watching tiny sprouts emerge and eventually grow into productive plants never gets old. It’s also one of the best ways to save money, grow unique varieties, and get a head start on the growing season.
If you’ve never started seeds indoors before, it can seem intimidating. You may wonder why your seedlings become leggy, why some seeds never sprout, or when it’s finally safe to move them outside.
The good news? Seed starting is much easier than it looks once you understand a few basic principles.
In this guide, I’ll walk you through everything you need to know to start seeds indoors successfully—even if it’s your very first time.
Why Start Seeds Indoors?
Many vegetables need a long growing season before they’re ready to produce. By starting them indoors, you give plants several extra weeks of growth before outdoor conditions are warm enough.
Benefits include:
- Earlier harvests
- Access to hundreds of seed varieties
- Healthier transplants
- Lower gardening costs
- Better control over growing conditions
Starting your own seedlings also means you know exactly how your plants were grown from day one.
Which Vegetables Should Be Started Indoors?
Not every vegetable needs an indoor head start.
These vegetables usually perform best when started indoors:
- Tomatoes
- Peppers
- Eggplant
- Broccoli
- Cauliflower
- Cabbage
- Kale
- Lettuce
- Celery
- Herbs like basil and parsley
Some vegetables grow much better when planted directly into the garden.
Examples include:
- Carrots
- Radishes
- Beans
- Corn
- Peas
- Cucumbers
- Squash
- Pumpkins
- Melons
- Cilantro
These dislike root disturbance or grow so quickly that indoor starting provides little benefit.
What You’ll Need
Seed starting doesn’t require expensive equipment.
Here are the basics:
Seeds
Choose fresh, high-quality seeds from reputable suppliers. Some of my favorite sources of seeds are Vego Garden, MiGardener, Park Seed Co, Renee’s Garden, Rare Seeds (Baker Creek) and Victory Seeds.
Seed Starting Mix
Use a light seed-starting mix instead of garden soil.
A good mix should:
- Drain well
- Hold moisture
- Be lightweight
- Allow plenty of oxygen around developing roots
Make sure it is labeled seed-starting mix because other mixes may contain bigger chunks of material that can make it difficult for seeds to push through the soil. My favorite brand for seed starting is Jiffy but you can absolutely try other brands and see what works best for you.
Containers
Almost anything with drainage holes works:
- Seed trays
- Cell packs
- Recycled yogurt cups
- Plastic nursery pots
My favorites are the cell trays from Vego Garden and GreenStalk but if you’re going for a budget-friendly options you can use just about any containers as long as they have drainage holes.
Grow Lights
A sunny window rarely provides enough light.
Quality LED grow lights produce sturdy seedlings and reduce legginess.
My favorites are the grow lights from Vego Garden and an alternative option, shop lights with at least 4600LM & 5000K. This can be an investment but if your planning to make seed starting a part of your gardening routine. It will be worth it as it can really make a huge difference in the health of the seedlings.
Another thing that I won’t consider necessary but will be good to have are shelvings to hang the lights and keep the seedlings organized. I mean you can put the seedlings anywhere but having a dedicated space for starting the seeds can make the experience more enjoyable.
Heat Mat (Optional)
Warm-season crops like peppers and tomatoes germinate faster with bottom heat. I didn’t own a heat mat until after a few years I started seeds but it’s a good option if you are starting seeds in a colder location. Temperature can affect germination so it’s something to consider if you notice that your seeds are having issues with sprouting.
Spray Bottle, Turkey Baster or Watering Can
Gentle watering prevents washing seeds away.
Step 1: Fill Your Containers
Moisten your seed-starting mix before filling containers.
The mix should feel like a wrung-out sponge—not soaking wet.
Fill containers loosely and gently level the surface.
Avoid packing the soil tightly.
Step 2: Plant the Seeds
Read the seed packet. I know most people don’t want to read manuals or instructions but it’s really helpful to do so before planting the seeds.
Most seeds should be planted about two to three times as deep as the seed is wide.
Tiny seeds often need only a light covering—or none at all.
Plant two to three seeds per cell to improve germination success.
Step 3: Keep Seeds Warm
Most vegetable seeds germinate best between:
70–80°F (21–27°C)
Using a heat mat can significantly speed up germination for warm-season vegetables.
Cool-season crops generally don’t require additional heat.
Step 4: Keep the Soil Moist
Seeds need consistent moisture to germinate.
The soil should remain damp but never soggy.
Avoid allowing trays to dry completely.
Many gardeners cover trays with humidity domes until seeds sprout.
Once seedlings emerge (about 75% of the seedlings), remove the dome immediately to improve air circulation.
Step 5: Provide Plenty of Light
This is where many beginners struggle.
Seedlings need:
- 14–16 hours of light daily
- Lights positioned 2–3 inches above seedlings
- Consistent lighting every day
If lights are too high or too dim, seedlings stretch toward the light and become weak. You can use books or anything to prop it up if the lights are fix or hard to adjust. I use automatic timer to help keep the lights on consistently with needing to constantly remember.
Step 6: Maintain Good Airflow
Gentle airflow helps seedlings develop thicker stems and reduces fungal diseases.
A small oscillating fan running a few hours each day works well.
The airflow should be gentle enough that seedlings sway slightly, not bend over.
Step 7: Thin the Seedlings
Once seedlings develop their first true leaves, choose the strongest plant in each cell.
Trim the extras with scissors rather than pulling them out. Pulling can disturb nearby roots.
Another option is separating the seedlings to individual pots to give each plants more room to grow.
Step 8: Fertilize at the Right Time
Seedlings contain enough nutrients to produce their first seed (cotyledon) leaves.
Begin fertilizing after the first true leaves appear.
Use:
- Quarter-strength liquid fertilizer
- Every 1–2 weeks
Avoid overfeeding, which can produce weak, overly lush growth or burn the plants.
Step 9: Pot Up If Needed
Fast-growing crops sometimes outgrow their starter cells before transplanting outdoors.
Move seedlings into larger containers if:
- Roots fill the cell
- Growth slows
- Plants become crowded
Fresh potting mix provides additional room and nutrients.
Step 10: Harden Off Before Transplanting
Indoor seedlings aren’t ready for full sun or wind immediately.
About 7–10 days before planting outside:
- Start with one to two hours outdoors in a sheltered location.
- Gradually increase sunlight and time outside each day.
- Bring seedlings indoors if frost or strong winds are expected.
- Water regularly during the hardening-off period.
This gradual transition greatly reduces transplant shock.
Common Beginner Mistakes
Avoid these common seed-starting problems:
- Starting seeds too early
- Using garden soil indoors
- Overwatering
- Underwatering
- Not providing enough light
- Leaving humidity domes on too long
- Forgetting to label seedlings
- Skipping hardening off
Even experienced gardeners make these mistakes occasionally.
My Favorite Seed Starting Tips
After years of growing vegetables in my Maryland Zone 7 garden, here are a few habits that have made a big difference:
- I always label trays as soon as I sow seeds. It only takes one forgotten label to realize how similar many seedlings look! I trick that I’ve learned is writing the labels first before even starting the process for a smoother flow.
- I use grow lights instead of relying on sunny windows. The difference in seedling quality is dramatic.
- I water carefully and avoid keeping the soil constantly soaked. Healthy roots need both moisture and oxygen.
- I don’t rush transplanting. Waiting until the weather is consistently favorable usually leads to stronger plants than planting too early.
These simple habits have helped me grow healthier seedlings and avoid many of the frustrations I experienced when I first started.
Frequently Asked Questions
Can I start seeds in a sunny window?
You can, but most vegetables don’t receive enough light from a window alone. Grow lights usually produce stronger, stockier seedlings.
How long do seeds take to germinate?
Most vegetable seeds germinate within 5–14 days, depending on the crop and soil temperature.
Should I cover my seed trays?
A humidity dome helps maintain moisture during germination, but remove it as soon as seedlings emerge.
How often should I water seedlings?
Check the soil daily. Water when the surface begins to dry, but avoid keeping the mix constantly saturated.
When should I transplant seedlings outdoors?
Wait until:
- The danger of frost has passed (for warm-season crops).
- Seedlings have been hardened off.
- Soil temperatures are appropriate for the crop.
Final Thoughts
Starting seeds indoors may seem complicated at first, but it quickly becomes one of the most enjoyable parts of gardening. With the right supplies, consistent care, and a little patience, you’ll be rewarded with healthy seedlings that are ready to thrive in your garden.
Don’t worry if your first attempt isn’t perfect. Every season teaches something new, and even experienced gardeners continue learning. Before long, you’ll gain the confidence to grow your favorite vegetables from seed and enjoy the satisfaction of harvesting food you nurtured from the very beginning.
Related Articles
To continue learning about seed starting, check out these guides:
- When Should You Start Seeds Indoors?
- Choosing the Right Seed Starting Mix
- Do You Need Grow Lights?
- Common Seed Starting Mistakes
- Why Aren’t My Seeds Germinating?
- How Often Should You Water Seedlings?
- Preventing Leggy Seedlings
- Potting Up Seedlings Explained
- Hardening Off Seedlings Without Losing Them
- My Seed Starting Setup

 Gingerfoot Garden
Leave a comment